Let's be honest. I like Apple, I really do, but what keeps me from buying Apple products is the fact that it's just too expensive, and nothing is upgradeable. I do like the looks of Apple products, though, except the iPod. I prefer my Zune. But doesn't that iPhone look slick? (It's expensive, too.) But anyway, let's design us one of those fancy iPhones in Gimp. Remember, you can click the images to make them bigger. Also remember to save often, since Gimp has a tendency to crash.

Step 1
Let's create a new document in Gimp, preferably no less than 1024x768 big. Make the background black. Create a new layer and name it "inner black." Get out the Rectangle Select Tool, and make a selection about like mine. Afterward, go to Select > Rounded Rectangle, and enter about 30 for the radius. Click ok. Change the foreground color to black, and the background color to #323333. Apply the gradient from bottom to top.


Step 2
Now we want to create the outer silver part that outlines the iPhone. Create a new layer and name it "outer lining." With your previous selection still active, go to Select > Grow. Grow by 15. Click ok. Select the gradient tool. Make the foreground color a light gray and the background color white. Apply the gradient tool from bottom to top. Create a new layer and name it "outer-inner lining." Select > Shrink. Shrink by 7. Apply the gradient tool from top to bottom.
Select the paintbrush tool. Select the Circle (01) brush. Make white the foreground color. Go to Edit > Stoke Selection. Select the paintbrush radio button. Click ok. Select > Deselect. I also took the blur tool around the white stroke a bit to smooth out the line. Merge the two outline layers.

Step 3
Get out the rectangle select tool to make the screen. Create a new layer and name it "screen." Fill the selection with #447AB0.

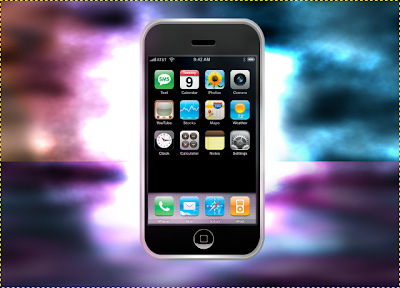
Now personally, I don't feel like making the screen completely from scratch. I guess I'm just too lazy to do it. I'm going to use this picture of an iPhone and steal it's screen. You can copy if you wish, or make your own.

Step 4
Now for the speaker. Create a new layer and name it "speaker." get out the Rectangle Select Tool and select an area about what I have selected. Select > Rounded Rectangle. Use 80 as the radius. Use black as the foreground color and white as the background color. Fill it from top to bottom like I have. Select > Shrink. Shrink by 3 pixels. Fill the selection with black.

Step 5
Now for the camera. Create a new layer and name it "camera." Get out the Ellipse Select Tool and select an area about what I have. Fill it with white. Select > Shrink. Shrink by 1 pixel. Fill the selection with a black and white gradient from top to bottom.

With your selection still active, click the paths tab above the layers dialog. Click on the Selection to Path button. You should have a new path pop up in the paths dialog. Select > Deselect. Grab the paths tool. Click and drag the new path into the work area. You should now have a path where your selection was. Use the path tool to adjust the path to about what I have done:

After you have your path ready, click the Selection from Path button in the toolbox. Fill the new selection with black. Select > Deselect. Get out the Rectangle Select Tool and make a selection like I have. Select > Rounded Rectangle. Use 30 for the radius. Fill the selection with a very light gray. Select > Shrink. Shrink by 1 pixel. Fill with black. Select > Deselect. Now we're done with the iPhone part of the tutorial. Happy? Good. :D


Step 6
Now let's create the rest of the advertisement. (This half of the tutorial is based on a tutorial by Fabio at PSDTuts.) Create a new layer above the background layer. Fill it with a radial, white to black gradient. Get out the Rectangle Selection Tool and select a rectangle that covers about the bottom half of the screen. Fill it with a very dark red on a new layer.

Step 7
Create a new layer. Select a blue color (#113e4b) for the foreground color and black for the background color. Go to Filter > Render > Clouds > Solid Noise. You should now have clouds in your previous selection. Go to Colors > Colorize. Slide the Hue bar until you get a dark blue like I have. Lower the Lightness a little bit.

Select the Perspective tool and distort the floor as I have below. Click Transform when done.

Add some blur to it by going to Filters > Blur > Gaussian Blue. Put 8 in box boxes and click ok. Lower the opacity to make it a bit darker.

Step 9
Repeat the steps 7-8 to create another set of clouds, but this time, use a dark pink hue instead of blue. Note: If you duplicate the blue layer, it won't work because we need to use different clouds.

Step 10
Create a new layer just like you did in step 6. Select black and white for your foreground and background colors. Get out the radial gradient tool and apply it, with white in the center. Change the blend mode to Dodge. Note: I've hidden my iPhone layer so you can see what mine looks like.

Step 11
Create a new layer. Get out the Lasso Tool. Create a selection like I have below. Then go to Select > Feather. Feather by 100px.

Go to Filters > Render > Clouds > Solid Noise. Let's add more blur to the clouds. Filter > Blue > Gaussian Blur. Put 35 in both boxes and click ok. Set the blend mode to Dodge. Delete the part of the cloud that is not on the floor.

Step 12
Now we'll create the background's light. Create a new layer. Use the Rectangle Select Tool and select the top part of the background (from the top of the floor, up). Go to Filters > Render > Clouds > Solid Noise. Click ok. Go to Colors > Brightness/Contrast. Lower the brightness and raise the contrast some.
Create a new layer and fill the existing selection with #84a7b8. Set the blending mode to Overlay.
Create another layer and get out the gradient tool. Create a new gradient with the colors #fba46f, #cb8cd4, and #346777. Fill the existing selection with that gradient. Set the blending mode to Overlay. I also took the eraser tool to the cloud layer we just made and erased some of the parts.

Step 13
Create a new layer. Get out the lasso tool. Make a selection like I have. Feather by 100 like before.

Filter > Render > Clouds > Solid Noise. Select > Deselect. Get out the blur tool and blur parts of the image. Set the blending mode to Dodge.

Step 14
Reveal your iPhone that we hid earlier. Let's add some lights in front of our iPhone. To do that, create a new layer.Choose a soft brush and and use about a 50% opacity. First choose an orange color, and brush a little bit up in the top left corner. Then, choose a pink color and paint around the left side of the phone. Change the blend mode of the layer to Overlay. You can also add another layer of clouds, but erase most of them, leaving behind a few gray parts.

Step 15
For the most part, we are completely done with it. Yeah, it does look a bit plain, with just the iPhone on top. I decided to use the Outer Glow filter from FX-Foundry Scripts (which you can download here) and added a few other glows.
For the most part, we are completely done with it. Yeah, it does look a bit plain, with just the iPhone on top. I decided to use the Outer Glow filter from FX-Foundry Scripts (which you can download here) and added a few other glows.