Alright today I am going to teach you how to create one of those colorful photo montages usually used in advertising. The original tutorial was written by Ian Keltie, a Newcastle-based commercial artist, for Adobe Photoshop and Adobe Illustrator. We are going to try to achieve something similar to this:
You will need a couple of stocks. You will need something for the main aspect, whereas the boy in the above example. I have decided to theme mine as music instead of money like in the original. I used one of Daron Malakian, guitarist for System of a Down. I will tell you about other stocks we will need as we get to them in the tutorial. You are going to need some textures as well. Here is the link to the ones used in the original tutorial. I will be using them as well.
1) Open up your main image in Gimp. Render it.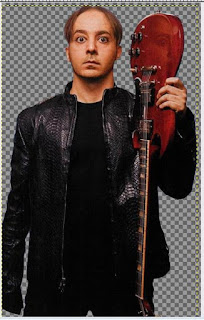
2) Duplicate it. Colors > Threshold. Play around with the slider until you get something you like. Get out the magic wand tool. Select the white parts of the face and the neck and delete them. Create a new layer. Make a selection with the ellipse tool that is covering the face and fill it with a bright color. I used orange. Select > None. Now move the layer with the circle below the black and white layer.
3) If the shirt of your person is white, it would be a good idea to add a design. In the original tutorial, it has some info about that. Download the original tutorial here (PDF; free) and read about that on step 7. Mine has a darker shirt, so there is no need for a design.
4) Open up the circle_texture image as a layer in Gimp that was in the pack you downloaded at the beginning. Move the texture's layer down just above the circle's layer. Right click on the circle layer > Alpha to Selection. Click on the texture's layer. Select > Invert. Delete. Select > None. Lower the opacity of the texture's layer to about 20%. Merge the texture and the circle layers.
5) Now get something to use as a pattern in the background. I actually did something a bit different and used two kinds of web dings music themed fonts to get a music themed pattern. I don't remember where I got them, though. Also be sure to mess around with the shapes, using the perspective tool, the rotation tool, etc. Make sure that whatever you used is black and white like your main person. Use the threshold tool to do that. Make sure the pattern is all in one layer. I also decided to make the canvas bigger so I can add more to it.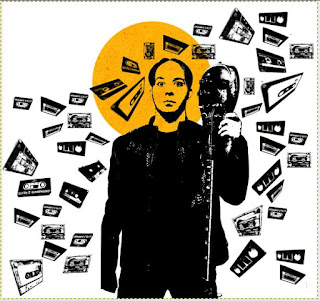
6) Now add some circular patterns in different bright colors to the background. I used some grunge brushes found on DeviantArt, however, I can't remember the name. After you've applied your brush on it's own separate layer, go to Filters > Artistic > Cubism.
Tile Size: 0.9
Tile Saturation: 2.5
Use this filter on each brush you apply. This filter gives it that "vintage" look. When you are done, put all the circles on one layer. Give the background a color. Black is good because it helps the other colors to pop out.
7) Now we will add some text. Get creative with it. You can also apply the cubism filter to it if you like. Also add other little ammentities to go along with it, like images that you have used the threshold effect on. Make it colorful so everything in black shows up. If you want, take a look at the original tutorial and it can give you a few pointers. I can't really help you with this part very much because it really comes down to your creative imagination for this part. When you are done, save it. There you have it, a neat little photo montage. (Click on mine below for the full image.)
Modified by Fireworks Tutorials, Flash Tutorials, Illustrator Tutorials, GIMP Tutorials and by Photoshop Tutorials.