
1) Create a new image. Give it a background color of #6d5608. Now set the foreground color to white and the background color to black.
2) Go to Filters > Artistic > Clothify.
Blur X: 8
Blur Y:8
Azimuth: 176.1
Elevation: 53.7
Depth: 1
Click Ok.
3) Click the Text tool. Instead of typing PSD like in the original tutorial, type GIMP.
Font: Arial Bold
Size: 140
Position it in the center.
4) Create a new transparent layer. Click the Rectangular Selection tool. Create a selection as shown and fill it with white.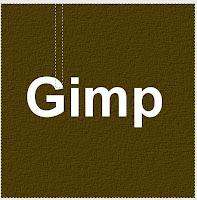
Do the same for the other letters on the same layer. It should look like mine: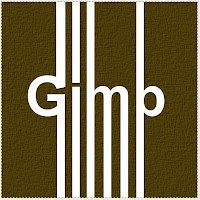
5) Duplicate the text layer, then merge the lined layer with the other text layer. Now rotate the lined layer keep note of the angle value. Do the same with the separate text layer, using the same angle value. Drag the text layer on top of the lined layer. Scale the lined layer and the text layer by 135%. Align both. If they appear blurry from scaling, run the Sharpen tool over them. It should look like mine: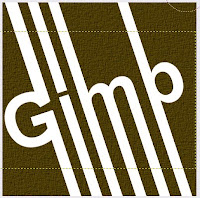
6) Create a new layer and name it "Yellow." Using the lasso tool, create a selection as shown: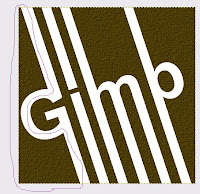
Fill the selection with yellow. Drag the yellow layer underneath the striped layer. It should look like mine:
Do the same for the next colors. Make sure to use a light blue, a darker red, and a darker orange. It should look like mine:
7) Now select the yellow layer. Apply the cloth filter to it like you did the background. Leave the settings the same. Do the same with the rest of the color layers.
8) Select the lined layer. Click the paths tool. Trace the lines on the lined layer, but just the lines only (look at the picture below to get an idea of what I'm talking about..I know it's confusing...) Press enter to get a selection. Filters > Light and Shadow.
X & Y Offsets: 0
Blur Radius: 8
Opacity: 90
Do not allow resizing.
Click Ok.
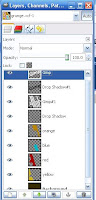
9) Apply a drop shadow to the alone text layer. Erase part of the drop shadow as shown in the image below. Also be sure your layers look like mine:
10) Create a new transparent layer. Filters > Render > Clouds > Solid Noise. Click Ok. Lower the opacity of the new cloud layer to about 20%
11) Merge the striped layer and the text layer. Alpha to selection on that layer. Create a new layer. Filters > Artistic > Cloth. Apply that filter. Now go to Filters > Render > Clouds > Solid Noise. Apply that filter. Now go to Colors > Brightness/Contrast.
Brightness: 98
Contrast: 43
Click Ok.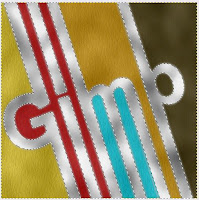
12) Select > None. On the new layer, go to Colors > Colorize. Adjust the hue till you get a light brown hue. Brighten the layer and desaturate it a bit. Click Ok. Lower the opacity of the layer to about 35.5.
13) Merge all the layers. Go to Colors > Brightness/Contrast.
Brightness: -39
Contrast: 72
Click Ok.
14) Go to Image > Canvas Size. Resize the canvas to 520x520 pixels. Move the only layer to the center. Create a new layer with a white background. Move it to the bottom on the layers stack.
15) Click the grunge tool. Now go crazy with your brushes. Be sure to change them by scaling them, changing opacity, etc. You can even use the Dodge/Burn tool to create a neat effect. In the end, you should have something similar to mine. There you go. A neat little grunge-style poster. (Click on the image to make it full size. Makes for better viewing, too.)
Modified by Fireworks Tutorials, Flash Tutorials, Illustrator Tutorials, GIMP Tutorials and by Photoshop Tutorials.